Sabtu, 28 Mei 2016

The NEW Wimberley Plamp 2, Plamp G and Plamp Extension, Chatty video Review.

The Plamp Stake with Extension and Plamp 2 attached to the camera tripod.

Hi everyone I have something for you photographers out there; something that I have been using for over 10 years probably more and thats the Wimberley Plamp.
"What is a Plamp...well sounds like a plumber's tool for unblocking drains and it looks at first glance a black bendy snake with a bird skull-like head and a forked tail ....or is that just me and my over active imagination?"  
Taken from my original review back in 2013.
Every photographer needs an extra hand well now you have it...you can have 3 extra hands...photographers dream eh...it sure is!!!

I was so lucky to have the amazing opportunity to have a look at all three of Wimberleys NEW Plamps!
 The Plamp 2, The Plamp G and a prototype of the new Plamp extension....soo exciting!
 I have had the original Plamp attached to my tripod for over 10 years now and its never come off as I use it so much! It has saved so many of my photos I wouldn't otherwise have captured; flowers blowing in gusts of wind, twigs or unwanted objects in my line of view or trying to capture an insect on a flower swaying in the breeze.

So checkout my indepth review below and my full chatty video to see all three Plamps in action, Im super excited to share the NEW Plamp family with you all.


If you just want to see my video scroll 3/4 way down! 

These Wimberley Plamps are honestly your flexible friends!
Any photographer will tell you that taking images outside you always need an extra hand and these are it.
They are the photographers helper; that wont moan about holding a reflector in the same place for a longer length of time, wont complain of arm ache and wont need feeding or have to stop for tea breaks every 5 minutes.

Here is my original Plamp and those of you following me may have already seen it in one of my very early reviews back in 2013. I simply cannot do without my Plamp so to find Wimberley have improved an already amazing design is exciting for me.

So after receiving these 3 NEW products directly from Wimberley it was absolutely perfect timing that our Bluebell woods were in flower; we are very lucky to live in the country and this was literally on our doorstep.

So I grabbed my Canon 7D, my Canon macro 100mm lens and my Manfrotto tripod and we took the Plamp Family for a test drive for the whole afternoon.
I was spoilt too as my other half offered to be my cameraman for the day while I show you all each piece and how it works. I hope you like the video it was a really fun one to make and Im proud of how it came out.

So Im going to run through each item in turn, but in many occasions they all work together as your flexible friends!
Then Ill show you the images I managed to take ONLY because I was using the Plamps as you will see it was pretty breezy that day...perfect for showing you the Plamps!

First of all let me show you how much the Plamp has changed. Its actually metamorphosed from one creature into another....

The main difference is the change of head.. The new version (Top) has a more intricate clamp with variable adjustment, they know what photographers have wanted. The head is slightly smaller and the gaps inside have been really thought out for securing flowers and plants. Ill go into that in more detail later on.

 The high quality pony clamps are basically the same and I can absolutely vouch for the wear and tear on these; however Ive rarely taken it off its been attached for over 10 years lol!

Okay its not until you see them together like this you can see Wimberley have made the super strong joints much thicker and individually more chunky.
(New version head at the top).

The Locline segments are larger than the original, it is also reinforced for less vibration after each movement. I hadn't even noticed the original bounced a bit after every adjustment until I used this; it really has a more defined movement.

 Wimberley biggest change is that they have completely redesigned the head clip; but I wouldn't have been without it for a second when photographing flowers and insects.
So on with the Plamp 2.....


The magic of the Wimberley Plamp's is its adjustable articulating arm made of 21 strong and sturdy Locline joints.

Measurements 
The Plamp 2 is approximately 62.5cm long including the clampy head which is 9.4cm. 
You then have 46.5cm of bendy joints.

 The head is made of Zytel ST (Super tough) nylon so its durable and solid. Perfect for extreme conditions.
 They have designed "4 main holes" for you to work with depending on thickness of your flower, twig or subject. The maximum this clip opens is an inch, thats plenty Ive never needed anymore.

The Wimberley logo is on the top.

You also now have more control of the pressure with a clever thumb screw activated clip jaw for precise opening and closing for more delicate subjects with stronger clamping when needed. 
Its really responsive and gentle...see my video!


But my favorite change has to be the foam inserts, this replaces my tissues I used to use in the original clamp to protect delicate stems.
Plus the number one hole is more flattened so objects cant spin; so they've thought of everything.

The foam surrounds the stem/s gently without crushing them, but still keeping it secure and stable enough from waving in the wind....genius...bye-bye tissues! Using this foam it doesn't matter what width the stem is as its so soft.
I would be mortified if I damaged the flower or stem JUST to take a photo. But NOW Wimberley have added these super soft foam inserts to protect anything delicate.


The third hole along is circular to hold rods or photographers reflector and also the new Carbon fibre rod Extension......see later!

 I didn't think I would use the smallest hole as its really tiny, but it was perfect for this Dandylion.


Well I did say "4" holes and yes there is; on its tip you have an adorable little hole which can hold flowers straight upwards.

 This reminds me of Audrey the flower in the film....Little shop of horrors.
Or is that just me lol!


 You can see here its holding a twig out of the way for me; but I'm also seeing a beautiful Red Rose being held perfectly in front of the camera for you to photograph...are you seeing it yet..?
I know I should have gone out and bought one especially I hear you say...!

I have to say these clamps are super high quality clamps and they have some serious pressure and it takes me both hands to use it...yes I am a bit of a weed..see my video!
The adjustable grips allow for variable angles and thicknesses of clamping.

 Inline image 2
These clever Pony clamps have an adjustment screw inside to adjust the strength of its clampiness...is that a word lol; what a great addition; but as its permanently on my tripod Ive kept it at its strongest. They've really thought of everything!

Note; just to say my tripod is a Manfrotto 055XPROB Pro Tripod
The clamps fit to most tripods with a diameter of 0.9 to 1.4 inches the Gitzo 1,2,3 tripods and nearly all the commonly used Bogen-Manfrotto tripods.


 Here you can see the Plamp 2 in action, look how perfectly it places your flower infront of your lens. It also allows you to choose you background and your light direction if you have the flower already picked. To get that stunning diffused background.

These are my own Lilacs that are perfectly placed, you also get the choice which side of the flower you want to use...try doing that in a bush or flower bed...its so awkward to get that perfect position; but not with the Plamp 2.

I couldn't have got these shots as my lilac bush is over 8 foot high and they have flowered in the middle of the bush. Id need a stepladder and a scythe to get up at them. Then I wouldn't have got this gorgeous diffused background.

Im so happy with these images.


 I also took some images of my just flowered Clematis; this flower was hidden up in my porchway.
Above you can see Ive used the Plamp2 to gently pull it away from the doorway, the clamp is carefully hidden behind the flower so I can still capture my macro shot. The stem fits loosely inside the last hole just preventing it from going back into place. I didnt even need to use the foam section as I only wanted to pull it gently into another position.

 Here are some the images I was able to capture thanks to the Plamp2.


 The Plamp G


 The Plamp G
The next in the family is something Im really excited about; as at first I honestly wasn't sure whether it would add to my photography...and ...wow was I wrong!
While reviewing this I found so many ways of using it I simply cant do without it now, its going with me anywhere I go for macro photography.
For the Stake in action please see my full indepth video review....

The Plamp G comes in 2 pieces, it has a hollow tube where a custom made screwdriver...yep I said screwdriver...that fits neatly into the tube for storage.  
The screwdriver is 17.5cm long

 I have to say its really a great quality screwdriver too so watch out for DIY enthusiasts in the family; my other half already has his eye on it. You know its yours as it has Wimberley printed onto the handle.

 When you want to use your stake simply pull out the screwdriver, reverse it and put it back into the tube you then simply force it into the ground...stake it!

The Plamp G is a "stand alone Plamp"...its just genius...High 5 Wimberley!
If you dont carry tripods around or simply use your mobile phones or a compact camera you can still get the Plamp2 technology with this version.

This clever idea is 74cm long, not including the screwdriver handle which pokes out slightly from the base.
The 20cm plastic tube gives it the stability and then you have 44.5cm of the bendy Locline joints, 20 in all which twists and angles in any direction you wish.

The Plamp G has the same head apart from its black which I actually really love with the same foam inserts as the Plamp 2 for those delicate stems.

It has same precise open and close action and you also get the same 4th hole in the tip perfect for upright flowers. Both the Plamp2 and the Stake heads swivel 360 degrees for more versatility too.

Place it anywhere for better light and background its so versatile.

It really looks like its munching on my lilac here, they do have a kind of real cuteness to them.


 The Plamp Carbon Fibre extension.


 The 3rd item from Wimberley is the baby of the Plamp family and I'm so lucky to have received a prototype of the
NEW Plamp Carbon Fibre extension clamp.
 Im sorry Im still seeing cute bird skulls or dinosaur heads...well arnt you?

 The idea as you can guess is that when you need that extra length or an awkward angle you have this little extension of 33.5cm which will position your subject/flower exactly infront of the camera lens for you.

The carbon 8cm fibre rod is super light and slim and fits perfectly into the plamps end gap; so you can tighten it securely.


It has 4 smaller versions of the Plamps famous Locline joints which is all you need with this. Plus of course exactly the same light grey head thats on the Plamp2.


 Here is the Stake holding the extension higher up and slightly angled; maybe for a background that is only higher up...its one of those things you dont know you need it, till you need it.


 An extra alternative is to use all three Plamps without any tripods at all; simply use the Plamp G as a base, then attach the Plamp 2 onto the tube of the G AND...if you need to...add the extension rod to either of the 2 clamp heads...cool huh!
Hey I dont know what Im trying to do Im just showing you guys the versatility, you get the idea.

 Storage
All 3 Plamps fold away easily as The Plamp 2 simply wraps round my tripod out the way and the Stake simply folds onto itself.


Please now take a peek at my Chatty video review as you can see all 3 Plamp's in action in this stunning bluebell wood. You will get more effect of the beauty of the woodland if you watch my review.


In the Bluebell woods
We decided to take the Plamps into the Bluebell woods which had just flowered right next to us for a test drive for the day. I was also lucky to have a field of Rapeseed next to this too with their beautiful yellow flowers.

So an idea of mine was to use the bright yellow flower against the blue of the Bluebells and the only way to do that is pop one into one of the Plamps as you can see above.
 So using the Plamp 2; I angled it as far as it would reach from my camera.

Just look how beautifully diffused the Bluebells are behind it due to the lens distance. 
Image 1 - how I took the image.
Image 2- the resulting image, thanks to the Plamp2.

 I absolutely adore the diffused look created by my lens but I couldn't have held it this far away from my lens by hand, I would have had cramp in seconds. I absolutely needed a 3rd hand here; plus it was a breezy day with wind coming off the fields.


The Plamp head held the flowers securely in the foam inserts and allowed me to alter the height and floppiness/spread of the flowers themselves, it gave me variety and flexibility.

 Then I wanted a more macro shot, created quickly and easily by simply swinging it infront of the lens in seconds, not even having to move the tripod..amazing!


 The screwdriver of the Plamp G sank beautifully into the soft ground, I didn't think it was going to be stable; but I was wrong as you will see in my video. Because of the flat sides of the screwdriver if the wind tries to turn it, it wont spin...genius!

The Plamp Stake allows you to achieve a further away shot that the Plamp 2 can give you if you dont have all your range of lenses. I never realized how much I was going to love this Stake...!

 Next I moved the camera and tripod to the edge of the Rapeseed field and using the same technique, captured the image below.

 Im so pleased with this shot all using the Plamp 2; I know you can get this hand-held Ive done it myself many times; however I got a more diffused image as it was further from my 100mm macro lens.

If you haven't read my first review of the original Plamp I also explain how Wimberley suggest how to shorten your Plamps and a few tips; so Ive briefly added them below too. 

Shortening your Plamp
Yes you can shorten the Plamp's arms by removing any of the segmented joints. To shorten the arm, bend the arm carefully till it reaches it maximum angle and it snaps in two (do not worry, you cant hurt the Plamp), remove a length and reconnect the pieces like lego.
Its quite tough to do as the pieces are super strong and for me it would have to be the possibility of an outstanding shot to go through the effort to shorten it.
I personally have never had the need to shorten it in 10 years as it has incredible flexibility and twistiness.

Tips from Wimberley

 If you need more reach or if you are using a 180mm or 200mm macro lens, you have 3 options.
  • Attach the Plamp to an object other than your own tripod,
  • Extend one of the legs towards your subject and than attach the Plamp further down the leg, thus closer to the subject,
  • Extend the length of your Plamp with the 12" Plamp extension; but in doing so the Plamp becomes a bit less rigid. 


Here is the Plamp2 and Stake allowing me to take images of both flowers against this background.
Summary
I am so pleased with all 3 of these fantastic Wimberley Plamp products. I hope I have these 3 as long as Ive had my original Plamp. The build quality of all 3 is amazing, they can withstand all weather conditions, plus being thrown around in your camera bag or rucksack.

The improvements to the Plamp2 is amazing the newly designed head is brilliant especially with the foam inserts...no more tissues...yay!
The extra chunky LocLine joints make it even more stable and secure; even though I have NEVER had any problems with the original. The clamps are still super strong and will clamp tightly and securely to anything from your tripods to branches and fences etc.

The Plamp Stake - its the first time for me using this and I LOVE it so much. The fact its a stand alone piece of kit is just amazing! Look at the height this reaches with the extension.
If I'm honest I didn't think I would use it like I have, now Im never without it, its always in my camera bag and as a macro photographer you just never know what your going to need untill you need it; they are so versatile.
Its not just for holding stems still for a flower/bug images, you may need a branch or stem bent gently away; removing clutter from the shot. Ive done this so many times.


Having both the Plamp2 and Plamp G gives me 2 extra hands to concentrate on the camera and settings. The main thing is you can move from a distance shot to a super macro in seconds, without having to move your heavy tripod; the adjustable arms are genius!

Extra note: Those of you that regularly sell items on Ebay may find this helpful to stabilize smaller products or hold a background behind your subject..


I wasn't sure if I would have a use for the Plamp Extension; but yet again I have been using it, to gain extra angles, extra height for my subjects, honestly guys when you need it you REALLY NEED it. Plus its just too darn cute for words....dont you think?


As a wildlife and macro photographer I generally work by myself so those extra hands are like gold dust when you need them. Ive also used them for reflectors and flashlights when you need that extra light too.

 Ive found the Plamp2 and Plamp G work perfectly together; the Plamp2 to hold my flower and the G to hold back clutter (dead flowers, twigs etc) from shot. But here you can see them holding a flower each so I can get contrast in colour. They are the perfect photography helpers...and you dont have to pay them or feed them chocolate and drinks lol!

 When not in use, you can use your Plamp as a headphone stand...great piece of modern art! I hope my other half doesn't notice his wheel trim gone missing!

If your a macro photographer this HAS to be in your kit, its a photographers dream. I seriously couldn't manage my macro photography without them; they really are your flexible friends!
Ive been using the original Plamp for over 10 years and the extra improvements make a huge difference and the Stake is just amazing!

Okay people this has been a long review but Ive had so much to say. Let me know what you guys think which one do you like; which would you see yourself using more. If you've any questions dont hesitate to ask?


But please checkout my full video and I hope I can help you choose the right one for you; but if your a macro photographer dont hesitate just Buy Now!


Buy yours from most popular Photography stores or read more here
Image from Wimberley

 If your in the UK Wex Photographic sells the Plamp2.
In the US Amazon sells the Plamp 2 and the Plamp G too.


All my thanks goes to the lovely guys at Wimberley for kindly sending me all 3 of their Plamp Family to share with you all.
My views and opinions are my own and my photos are also my own unless otherwise stated.

Over the last 10 years Ive taken some of my best published Images using the Plamp. Its held the plants stable so the wind doesn't scare off my bugs...perfect!


Senin, 23 Mei 2016

Are you just plain bored with your plain keyboard?


Rekindle your Keyboard love

There are several different ways to jazz up that old computer you have. When it was new and shiny you may have given it a nickname cos it was fast it was cool and you were so proud; it sat where you could give it admiring glances, polish it so it shone like the technology of tomorrow and you loved showing it off to all your wide eyed envious friends.

As time went by maybe you weren't so attentive, you stopped wiping its discolored fascia or blowing the dust of the do-dars inside; then one day you may have relocated it under your desk, just temporarily you tell yourself but really its so as not to draw to much attention to thing like the 3.5" floppy drive, the coffee cup stain on the top or that beige is not such a fun color for a computer anymore...has the love really gone.

What can you do to rekindle the passion you once had for this box of bits.....let me tell you..........

You could -
    1. Format the HD and reload the operating system add updates+drivers+programs+passwords; curse when all your documents and music files that you have spent years collecting, disappear. This; if the PC gods are in a good mood should remove as much bloatware as possible and might even clear the virus's, continual crashes, blue screens and reboots if your lucky.  
     Cons- Time and do you really know where all the old software discs are.
      2. Overclock your old computer's CPU, memory and graphic card to within an inch of its life.
      Cons- Takes time to learn the black arts and may shorten its already hard knock life.
        3. Remove your ageing platter disk and fit a new solid state drive, boy will it boot up quick and be a bit quieter; but please refer back to No1.
          4. Purchase a new faster processor "Oh...but...now you need a new motherboard...Oh...and new memory...Oh...and you can't fit the old Graphic card in the new Motherboard; cos it looks rubbish...Oh...AND IT'S STILL BEIGE!"
            5. You could head to your local PC shop with a large wad of cash be talked down to by a spotty teenager assistant and convinced to buy a new (old model) computer that the shop has been trying to shift for their new stock coming in the very next day, of course it will be pre-installed with bloatware and seriously overpriced, but at least then you could  
            do a nice thing and give your old computer to a friend or family member, they might like beige; it may go well with the cord trousers they are wearing.
            Cons...You are still responsible for fixing it when it goes wrong... COS obviously it's your fault!!!

              Now think what is the one item on your desk that takes a hammering most of the time, has more bacteria on it than a truck stop toilet seat and shows that you have been playing Call Of Duty waaaay to much.

              To use an old analogy if your car needs to go faster just add go-faster stripes it will feel quicker.
              I give you the go-faster peripheral for your computer...bring in the love. Drumroll....The keyboard and mouse!


              Pro-Gamers Keyboards and Mouse reviews coming soon!

              Super Excited to have the opportunity to share with you all 
              VicTsings latest 2016 release 
              with multicoloured LEDs and backlights for pro-gamers
               and


              I have to see if this will replace my Logitech G-19 keyboard and Logitech mouse Im already using?
              See you all very soon. 


              Sabtu, 14 Mei 2016

              DB Power Large rear view mirror with Dual lens Car camera Dash cam and night vision

              DB Power Large rear view mirror
              with Dual lens Car camera, car dash cam and "partial" night vision with 5 inch display screen.

              DB Power

              We all appreciate a product that makes us safer as we speed around in our busy lives and if it can also be aesthetically pleasing it has to be good, now imagine also that the product could save you hundreds of pounds or prove your true word against somebody deceitful, then you would be thinking hell-yea, I need that in my life, well read on.


              So checkout this clever rear view mirror review below.

              Im the kinda girl who enjoys gadgets, but normally the car and auto gadgets are my other half's thing...until I saw this... wow it not only looks incredible but the technology this has is just amazing.

              As far as packaging goes the box is clean white with a good image on the front; its a solid box too to keep it in.

              On opening this box you will be impressed...very impressed.
              This rear view mirror is twice the size of your average bog standard rear view mirror you probably have in your car.
              What look like blemishes on the product is only air trapped behind the protective film, once peeled away shiny, shiny.

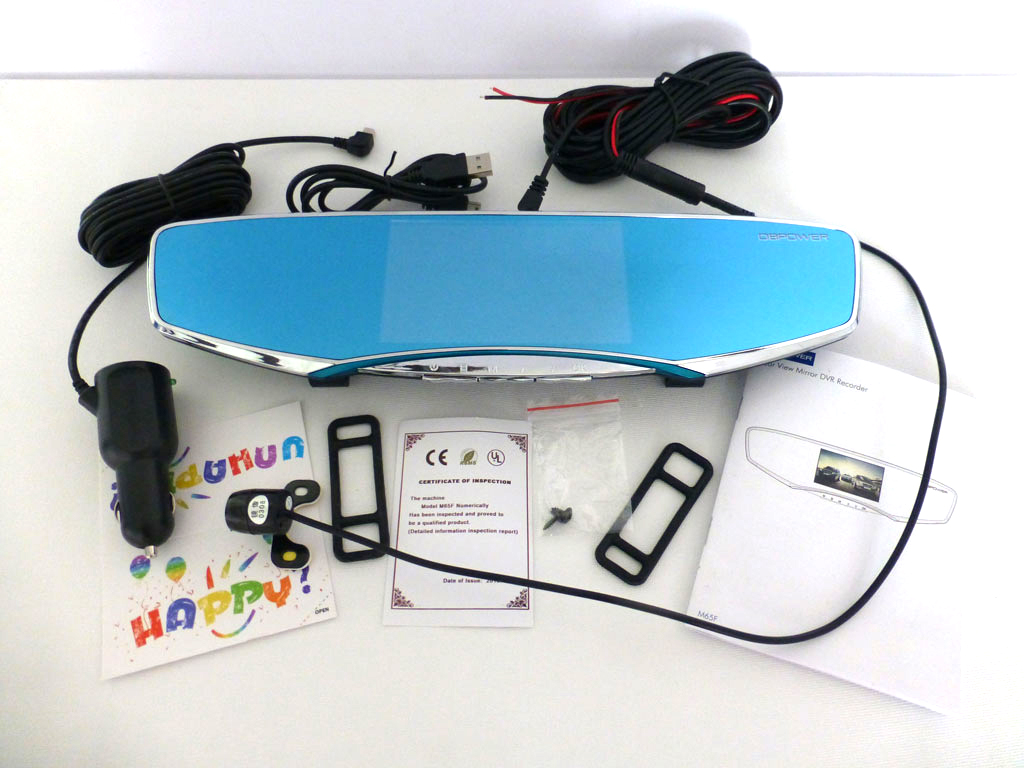
              In the box we also have a Car charger, USB Cable,
              Fixing belts, Rear camera + mounting screws and the User manual in converted English, somewhat hard to decipher but most of the fun is had playing around with the settings yourself.


              Before we start I just wanted to show you the dash cam we are using at the moment this is the type that suckers to the window, it has served us well but looked dated. The comparison images are showing the back and the front. This new unit combines the mirror and the front dash cam and has a rear cam to help with reversing, plus a microphone and speaker built in.
              Anyone that knows me knows I REALLY NEED all the help with parking, I have been known to drive around the block several times rather than attempt to parallel park, lol; I literally do not do reversing unless I have to...so Ive absolutely no excuses now!

              The back of the mirror is showing the forward facing swivel camera this can be rotated around for the best viewing angle and the large clips are used with the fixing belts to attach it to your old mirror, I have found this to be very stable.

              With this unit you will need to purchase a micro SD card so you can save all your data and recorded footage. This will need to be a class 10 or above for compatibility, we tend to stick with the Samsung EVO SDHC UHS-I card for most of our projects, bit of a mouthful. The instructions recommend 8GB to 32GB.

              On the back of the mirror.
              GPS port for your own sat, TF card slot, Rear camera port, Car charger jack.
              Note - when the mirror is attached in the car, getting access to the push in/ pop out card is a bit awkward, would have been better suited at the side of the unit, but then think how often will you be removing the card.

              The buttons run along the bottom of the mirror in a plastic silver, this does actually feel and look a bit cheap, however you can see its going to take the continual use if your using it all the time. I'm hoping the coating wont just wear off; it hasn't so far.

               So here are my detailed measurements and yes it really is this gorgeous blue, very modern looking but it doesn't distract you while your driving either.

              Cable Measurements
              550cm from the rear camera port to the connector.
              Reversing switch Positive and Negative cable for the camera is 200cm to the connector.
              Between connector and camera is an extra 50cm in length.


              Features
              • This mirror has a 5 inch LCD screen in the middle of mirror.
              • Dual lens camera design.
              • Front camera has a 140 degree viewing angle.
              • When connected to backup lights, auto monitoring is triggered to show on the display LCD screen at the sometime as the vehicle is backing up! 
              • Picture in Picture display.
              • Motion detection.
              • It has automatic ignition detection and recording with a G-sensor.
              • Can be used to monitor while parked.
              • Auto display off when stopped to save power.
              • Seamless video recording in loop to ensure efficient use of storage.
              • Night Vision for interior clips and shots.
              • Built in microphone and speaker function.
              • Bluetooth.
              SD Card
              Please note that this mirror supports up to a 32GB card NOT included, you must make sure it is class 10 or above or it may damage the device!

              Motion detection
              The motion detection is so damn clever in the fact that you can set it to "motion detection mode" so the mirror will record when the vehicle moves, it stops recording if it hasn't moved for 5 seconds.

              Picture in picture display
              I couldn't believe it has this; it can display both front and rear videos on the mirror at the same time. So its amazing while reversing and if you are being followed you dont have to keep turning round.
              For me I have severe back problems so the fact I dont have to keep twisting round is such a genius idea.


              Collision induction function
              A posh name for the built in G-sensor which cleverly knows when you've been hit by the sudden jar and wait for this...it records 10 seconds before the collision and 10 seconds after....WOW!
              It even has a file lock which activates immediately after a crash so that video file is saved and cannot be recorded over.

              Tech Spec
              For those that want to know the ins and outs of the bees knees.
              • CPU - Allwin F23 melis.
              • DDR - 64M 16 bit DDR 1.
              • Screen - 5 inch HD LCD screen.
              • Resolution - 480 x 272.
              • External port - USB 2. 
              • Rotating camera 250 degrees manually.
              • Camera angle - 120 degrees wide angle.
              • Rear camera angle - 105 degree wide angle.
              • Video format - AVI.
              • Photo format - JPEG.
              • Store format - MJPEG.
              • Battery - 420 mAh lithium Battery. 
              • Front Camera - HD1280 x 720 (30fps).
              • Rear Camera - D1 720 x 480 (25 fps).
              • Photo resolution - Max 3M

              Use
               You have to simply plug the unit into a cigarette lighter and you can then hide the cable that is left, behind fascia's.
              I absolutely love the dual lens design the v140 degree viewing angle is so impressive it captures completely from one side of the road to the other.


              You can set the rear cam up in or out of the car, the images say it all.  
              Image by DBPower


               When you set it up; this is how you see the screen, its very cool and you have a huge range of settings to go through too, they are all worth it, you need to take the time to sit and go through them you can do this in situ of the car but it is easier to set this up before hiding the wiring as you can hold it comfortably.


              Checkout just how clear it is and I love the huge size too, I was worried I may not get used to this, but I can't go back to a normal one now lol!
              Plus you dont notice there is a 5 inch LCD screen in the middle until you crank it into reverse, then it comes on. 
              I have found on my car that because of the length of the mirror my sun-visors dont go all the way forward anymore, this is more pronounced on the passenger side because of the angle of the mirror, your sun-visors may be further apart, but check my measurements from earlier on .


              You can use your settings to continually see the road behind, this is amazing on a long trip, just dont get to distracted. Image by DBPower

              I have to show you in my living room, just how bright the front view camera is as it sends this to the LCD screen, its fairly dark in my room...imagine a dark, dusk evening on the road...see how bright its showing the room...or road!


              The HD video is crisp and so very clear day and night...Im really impressed.
              You can also manually take a photo and record if you wish too!
              Image by DBPower


              I really can recommend this clever piece of kit, I did need my other half to fit it for me as its hard-wired in with the rear cam, but for power you can just plug it into your ciggie lighter.
              I love the size and the buttons are easily accessible, you can change from picture in picture easily and quickly.
              But for me its the reversing, its actually life changing for me as I can finally see behind me, the camera auto kicks in on the mirror so I'm not twisting behind me to reverse and its so clear too. You would never see this clearly when reversing normally so its safer too...especially with me around lol!

              Its a bit dearer than your normal rear view mirror, as that comes with your car for free...but can you really put a price on safety and you get something thats a certain conversation starter; all your friends will want one of these once they see yours I can absolutely guarantee.
              Its a fab piece of kit for any petrol-head too.

              I will leave you with this to ponder, if you feel the need to have sleepless nights or fit-full nightmares you could go to YouTube and type in Russian dash cams, there are so many ways that accidents can happen on the roads, a loose wheel, a broken ball joint, tired/distracted driver BUT sometimes they are not even accidents but done purposefully, it could be your word against somebody trying to scam you or your insurance company, this is where DBPower's front and rear DVR can come in very handy. Can you really put a price on piece of mind.

              Buy yours from
              £49.98


              All my thanks goes to DB Power for kindly sending us a sample for this review.
              All my views and opinions are my own and all images are mine unless otherwise stated.


              Jumat, 13 Mei 2016

              NEW Reviews of the Wimberley Plamp family, VeryFit 2, Fabercastel, TWSBI and Lamy and many more!


              Hi everyone I hope your now enjoying the lovely warm weather we are getting finally in the UK.
              I just had to do this post as I have alot of exciting new reviews for the planner and journaling communities out there. It just so happens that its gone crazily busy with arty products this month for reviews. So I wanted to give you guys a quick outline of whats coming up in May on GGR.

              Ive been getting into my coloring and journaling in the last month as Ive been visiting my elderly Dad after his serious fall.
               
              I was kindly sent a set of 3 water brushes to review by Xpassion on Amazon and of course what better way to review those than using watercolour pencils with them.
              So I treated myself to some Faber Castel 24 Albrecht Durer watercolour pencils which Ive had my eye on for months now and I just cant wait to use them.
              Reviews coming very soon!

              Ive also have my anniversary pressie from my other half...super exciting for me as I managed to get a limited edition TWSBI 580AL in lilac as I absolutely fell in love with this particular colour no longer available....typical me eh!
              The lovely guys from TWSBI have been amazing and they actually told me there "wasn't one purple part left in their factory". So you can imagine my excitement when I discovered THE right pen, in the right colour with my favorite "fine" nib in a beautiful shop called Akkermans in Hague Switzerland.

              So to go with my beautiful new TWSBI I just had to have some purple ink...well a girls gotta have everything coordinating dont they! So I ordered 2 different shades of purple Diamine inks (I simply couldn't decide between 2 shades lol) from PurePens in the Uk; plus a pink and green.


              To top it all the lovely Ruth from The Pen and Inkwell was selling her Blue and green Lamy and I couldn't resist. It arrived today woohoo!

               Just look at how it goes perfectly with my FoxiDory from Lyra and Co.
               Let me know if you guys want to have a review of this stunning little lamy?


              Talk about amazing timing; I will also be bringing you guys a review on a Marco Raffine 72 pencil set and gorgeous new pencil case  which has been kindly sent to review from Feelily on Amazon.
              So guys its an arty May coming up with of course a dash of gadgety reviews how could I not; so here is a snippet of the gadgety reviews coming soon.

              The rear view mirror/dashcam and reverse parking cam...AMAZING piece of kit cant wait to share!
              Plus

              From the heart of our Bluebell wood I have a fabulous video introduction and review of the NEW family of Wimberley Plamps straight from the US
               The Plamp 2 in pik one,
              The Plamp stake in the middle and the clever prototype of the NEW Plamp carbon fibre extension in pik 1 & 3.
              I am beyond excited to show you guys Im so lucky to have this exciting opportunity to share these with you.

              Lastly one of the very latest Smart watches from Gearbest The VeryFit 2.0 smart band. I have it on right now and Im working my through all its incredible settings.
              So reviews will be flooding this space very soon!
              Huge thank you to those of you that sent Get Well wishes to Dad...yes he is doing so much better now.

               XxX

              See you all very soon and please bear with me while I get my reviews back on track again and I will see you all very soon.

              Bye for now