
I'm hopping up and down with excitement as my new photography toy has arrived. Those of that know me know how much I love my photography its been a hobby since I could hold a camera over 40 years ago now....eep!
I was originally brought up with film cameras where I even developed my own prints using the developer, fixer and rinse and you can never take away that moment your image starts to appear through the tray of liquids, similar to the fun of using a Polaroid camera...but without standing in the darkroom choking on the chemical fixer fumes lol.
Saying that; it still brings back really fun memories.
Saying that; it still brings back really fun memories.
I have 5 main lenses which I use with my Canon 7D as I adore taking a variety of styles of photos from lifestyle and product photos to my wildlife images and my all time favorite my macro bug images. More recently I have enjoyed being more creative within the camera and have wanted a faster lens with more bokeh for years. The widest I have is a f2.8 on my Canon Macro lens but I wanted more and at last I finally have it.
See after the jump how I chose the right lens to suit me and a full review of the gorgeous Sigma 50mm f1.4 EX DG HSM.
Ive used Photoshop since 1998 ps5 and yes you can get a certain amount of bokeh if your a whizz with photoshop; but its never quite the same as getting it straight from the camera.
That stunning flower popping from its dull greenery behind it, or you want a persons face to pop from a crowd or emphasize the soft cute eye or nose of a dog, well you get the idea....
So after a lot of reviewing I narrowed it down to 3 lenses to choose from;
So after a lot of reviewing I narrowed it down to 3 lenses to choose from;
- Canon 50mm f1.4
- Sigma 50mm f1.4
- Sigma 30mm f1.4
With yet more thinking I decided I wanted a tighter frame than the 30mm although its a stunning lens, but felt a 50mm would also give me tighter product images with some background. I had also heard in other reviews it made an awesome video lens for my own Canon 7D. So reading yet more reviews I finally decided on the 50mm soooo then...it was just between the heavyweights Canon and Sigma.
So finally after watching endless YouTube videos looking closely at 100s yes 100s of images I finally chose...drumroll....the Sigma 50mm f1.4...WooHoo!
I know I could have just said I bought the Sigma one, but where's the fun in that!
It arrived today and I'm so excited. I bought mine from Wex photographic as it was not only the cheapest but Ive bought from them before and they have excellent customer service and always been there for advice and help.

It was padded for England as you can see above; wrapped in thick large bubble's bubble wrap to almost four times the size of the box inside. Then a layer of waterproof packaging on the outside. Thank goodness my postman was in a good mood today and didn't try shoving it into the postbox phew!

Inside was my new lens and a Hoya UV filter 77mm to protect the new lens.
Nag alert: Never, never buy a new lens without a putting on a good quality UV filter immediately its out the box.
Believe me I learn't the hard way many years ago. I was so excited to use my new Canon lens from the box I couldn't wait till my UV filter had arrived and while photographing an offroad Jeep yes you guessed it; a stone chip hit bang smack in middle of the gorgeous shiny new Canon 100mm Macro lens. Luckily it never effected any images and is still one of my favorite lenses today.
*Believe me the day you see a scratch, chip on your filter you will breathe a sigh of relief it wasn't your expensive lens.

My new Hoya HMC UV filter 77mm
Tip; Stick with Hoya as they make excellent quality glass and they have never let me down. I have over 6 lenses each one with a Hoya filter on and Ive not 1 scratch on any of them...eep ...I hope I haven't just talked it up!
Its no good paying hundreds of pounds for your amazing new lens to then put cheap quality glass on the end. Your then not getting the quality of the images as its going through crappy glass...your defeating the object aren't you....ok...nagging over...! ;-)

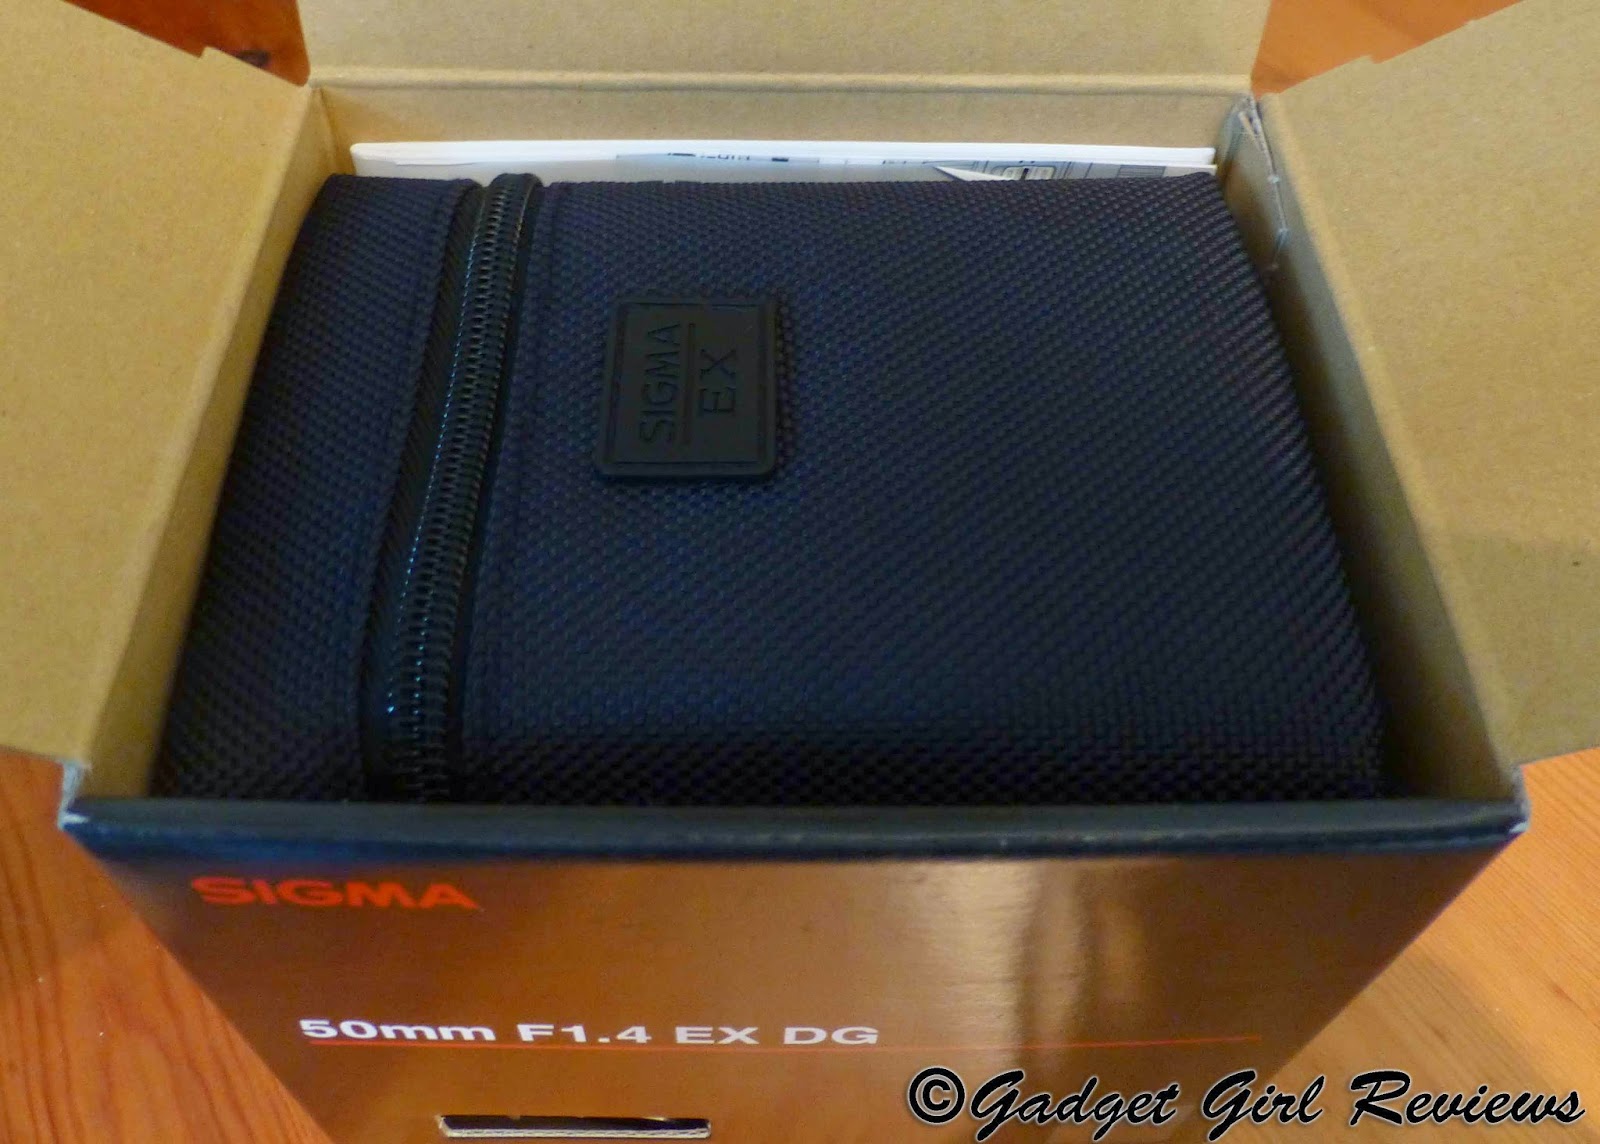
The lens and case are well packaged inside with warranty and guarantee.

What I always love about Sigma lenses is that you get a case and a lens hood. Only Canon's high end L series lenses come with case and hood....sorry Canon I do still love you but... you really need to give your customers some little extras, even if its only a lens cloth.

This case is made of strong black ballistic nylon with double zips and belt loop and leather logo on the front. Inside is padded with lightweight shaped foam to hold the lens firmly inside.

In the box you get your Sigma 50mm f1.4 lens, lens cap and base.
Flower petal lens hood.

The petal-type lens hood it amazing quality made from 4mm thick plastic and blocks out extraneous light and reduces internal reflections.

It screws easily onto the main lens and using the triangle arrow and dot to line up locks-on with an extra click.
Lens Terminology
DG
Sigma's lenses are designed for cameras with a full frame sensor, but cameras with a cropped sensor (mine) can also use them. These are large aperture lenses with wide angles and short minimum focusing distances. They have alot of peripheral illumination so they are ideal for digital SLR's whilst also suitable for traditional 35mm SLR's.
HSM (Hyper-Sonic Motor)
These lenses are motor driven by ultrasonic waves to offer quiet, high speed autofocus. Those of you that have used lenses without HSM will know how noisy they can get; Ive had them frighten off my wildlife Im shooting in the past on other lenses.
EX
The exterior of the lens is EX-finished meaning superior build and optical quality to enhance its appearance.

Okay lets just take a moment to admire this stunning looking lens...sigh!
Description
This Sigma 500mm f1.4 EX DG HSM is a fast prime lens and ideal for Portraiture. This lens effectively becomes an 80mm medium telephoto lens on APS-C sensor cameras.
It has a minimum focusing distance of 45cm (17.7 inches) and a maximum magnification of 1:7:4 with outstanding optical performance throughout the entire focusing range.
The fast wide f1.4 aperture gives superior peripheral brightness and the 9 rounded blade diaphragm creates an attractive blue to out of focus areas.
Measurements
Length with petal lens hood is 12.2cm.
Widest point is 8cm without lens hood and 9.2cm with lenshood.
 Use
Use
Lifting the lens out the case it has a gorgeous substantial weight to it and oh my goodness you can feel the quality oozing off of it.
This Sigma 500mm f1.4 EX DG HSM is a fast prime lens and ideal for Portraiture. This lens effectively becomes an 80mm medium telephoto lens on APS-C sensor cameras.
It has a minimum focusing distance of 45cm (17.7 inches) and a maximum magnification of 1:7:4 with outstanding optical performance throughout the entire focusing range.
The fast wide f1.4 aperture gives superior peripheral brightness and the 9 rounded blade diaphragm creates an attractive blue to out of focus areas.
Measurements
Length with petal lens hood is 12.2cm.
Widest point is 8cm without lens hood and 9.2cm with lenshood.
Lifting the lens out the case it has a gorgeous substantial weight to it and oh my goodness you can feel the quality oozing off of it.

The distance indicator window is clear and smooth and shows a choice of meters and feet. For those that don't know this helps to show you an approximate range of acceptable depth of field at different apertures.
It also has an infinity symbol too which helps to get everything sharp if you need the visual help.
It also has an infinity symbol too which helps to get everything sharp if you need the visual help.

Autofocus and manual focus switch
I love lenses with this switch as you have the choice of auto-focus or manual as I use both depending on the image Im after. If its wildlife and continuous shooting Ill use Auto-focus, but I use manual most of the time especially with this lens as I want small aspects pin-sharp and the rest a beautiful fade.
I love lenses with this switch as you have the choice of auto-focus or manual as I use both depending on the image Im after. If its wildlife and continuous shooting Ill use Auto-focus, but I use manual most of the time especially with this lens as I want small aspects pin-sharp and the rest a beautiful fade.

Lens with lens cap and base on.

My only niggle is that my lens cap is a bit fiddly to clip on with the UV filter on.


Sigma have it nailed with beauty of lenses with the gorgeous gold accent ring and their EX sigma logo; it really adds elegance and class to this lens.
The manual focusing ring has a good grip ring. Its firm and very but responsive.

 Even without the petal lens hood on it looks really substantial on my camera.
 With hood it looks professional and gives you a quiet confidence it can cope with any image you want to capture.

 This is my style of pretty flower shot I love taking. I have to have part of the flower super sharp; however some lenses just cant give me both sharp and fade that this Sigma can and its so soft and romanticky.
 My cat and bird garden ornament was taken at f/1.4 as you can see on my camera settings; but I have produced slightly different background effects, depending on the light and position.
 I prefer my 2nd image as the cat and bird just pops from the background which has blurred beautifully. The bird in particular is sharp.
 More examples are of an up and coming review of my new Peony flowers Ive been collecting. See the variety of artistic styles that you can capture using the one lens; no more swapping lenses every 5 minutes like Im used to doing. The wide f/stop allows me complete control over my images.
 I also want to show you just how fast this lens is too. While photographing these flowers, the wind blew it straight off my table in midshoot and I was delighted to find this image while downloading them. See how sharp both flowers are.
NOTE; no flowers were damaged during this shoot as they were plastic...shusshh!
 Here I shot these Highland cattle (not literally lol) on f/2.8 so they are lovely and sharp but the foreground starts to fade a little and so does the close wire fence and branches above where I'm standing. Ive deliberately not removed them in Photoshop so you can see how the lens almost makes them disappear just by settings alone.
 This big fella I shot on f/5 so the whole image is fairly sharp even almost up to the far trees.
 I took the same image on different f stops to show you just how beautiful the bokeh is; bet you can tell my favorite; yep its the f/1/4 as it is just so scrummily soft. Im so happy with these results.
But you now have the choice whether you want beautiful bokeh or sharp all the way through.
Its totally a personal preference!
 This pik was taken at f/2.8 to get more detail of the flowers in and fade any background clutter of the table and bottle; they really pop from the image.


On Camera
First of all I have to say this 50mm lens was made for my Canon 7D; its a large bulky camera and some small lenses can look lost or look like a kids toy on it, but not with this Sigma. You can see how balanced it looks from all sides. Its the perfect lens...well except the 600mm that would look amazing if anyone wants it reviewed...joking of course.
What type of photography is this lens best for?
This Sigma 50mm f/1.4 is quite a versatile lens and can cover alot of style ground but here are what I feel this would suit best.
- Portraits and weddings as it will be gorgeous to get that romantic blur with the rings and the bouquet, the brides eyes and makeup etc.
- Perfect for pretty flower piks.
- Product and still life photography.
- Indoor photography without a flashgun.
- Casual snaps.
- Street photography.
- Landscapes.
- Lowlight photography as its fast.
The resulting images
So lets talk about the images as thats the most important isn't it. Firstly I'm so happy with the results, its a stunning lens, substantially built, excellent quality and the images through the f stops are just gorgeous. This was exactly what I wanted and was missing from my kit. I wanted to capture that beautiful bokeh and softness.
So let me show you rather than ramble on...okay maybe its too late to stop me rambling on lol!
NOTE; no flowers were damaged during this shoot as they were plastic...shusshh!
But you now have the choice whether you want beautiful bokeh or sharp all the way through.
Its totally a personal preference!
Opinion
I could keep showing you example piks forever; but this would be an even longer post than it already is...oops sorry...lol! I hope these images are enough to convince you how versatile this gorgeous lens is.
I'm actually blown away with how stunning this lens is, the quality and build is outstanding, I feel it looks more expensive than it was and the HSM (Hyper Sonic Motor) is smooth and barely heard compared to my other lenses. The images produced are bright and vivid as well as sharp, there are no obvious aberrations as the optical design and moulded glass lens elements correct many of them. Ive certainly not noticed any in my images.
The lens itself is heavier for its size but you are saving on dragging 4-5 lenses with you on a day trip. This versatile lens would cover a day out perfectly, its also a shorter lens taking-up less room in my camera bag.
Ive literally fallen in love with this lens, Ive wanted perfect bokeh and now I can have it. I cant wait to show you more images at a later date. I will be using this lens for future videos too as its the ideal size frame for my product YouTube videos.
This was a fantastic investment lens for me and I cannot see how the lens could be improved by Sigma's new Art lens version and certainly not for the hefty £895 price tag it carries; it just seems crazy.
This lens is selling for around £320 new but you can get some second hand lenses with people that are updating to the Art series; so you may get a bargain as its a fantastic staple lens for your kit if your not sure which lens to get next.

£319
From Wex Photographic
From Wex Photographic
at time of press.

Note: I have not been paid or supplied with a sample for this review. The lens was paid for by me.
Do you own this lens; if so what do you think of it? Or are you thinking of buying it and have some questions as Ill try and help.
Coming soon reviews of my tripod and head.


Horizontal Grip Action Ball Head with RC2 Rapid Connect
&

Manfrotto 055XPROB Pro Tripod
Thanks for popping by


